Bathroom Remodeling – How to Design a Functional and Attractive Bathroom

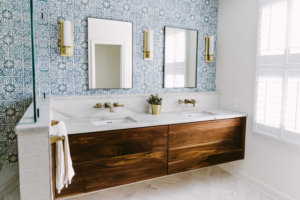
When remodeling a bathroom, keep your goals in mind and avoid over-extending yourself. For example, if you add a second sink or granite countertops, consider how that will affect your storage spaces and utility locations.

Changing the layout of your bathroom is a big project that should be left to professionals. Moving a toilet, enlarging a shower or installing a new tub are examples of layout changes. Contact Bathroom Remodeling Richmond VA now!

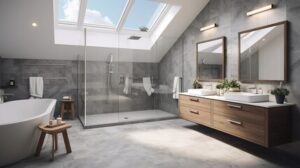
A well-designed bathroom should be both functional and attractive. It should also be easily adapted to accommodate changes in physical ability and lifestyle. If you’re planning to remodel a bathroom, consider installing energy-efficient fixtures that will help save money over the long term and minimize your environmental footprint.

The first step in the design process is to create a budget and decide how much you’re willing to spend. This will help narrow down the options and make it easier to choose finishes, fixtures, and other details. If you’re unsure of where to start, it’s often a good idea to consult with a professional designer who can provide guidance and suggestions.

Another important consideration is how to maximize storage space and layout. Having enough storage can help prevent a cluttered and unorganized look and feel. It can also be a great way to add some personal style to the room.

Once you’ve established your budget and chosen a layout, it’s time to get started with the actual construction. During this phase, it’s important to stick to your budget and avoid splurging on items that you don’t really need. It’s also important to allow for extra expenses such as unexpected labor or material costs.

If you’re doing a full-scale renovation, it’s usually necessary to remove and replace the existing drywall. This is more invasive and expensive than simply replacing fixtures and finishes. It may also require the services of a professional demolition crew and may affect the overall timeline of your project. If you’re using new drywall, it must be moisture-resistant to prevent mold and mildew growth. It’s also a good idea to install an exhaust fan to reduce humidity levels in the room.

One of the most important decisions to make in any bathroom remodeling project is how to arrange the space. Whether you have a large master bath or a cozy guest bathroom, getting the layout right can take your project from a DIY fix to a high-end renovation.

Depending on your goals and budget, you can go as far as completely rethinking the entire room’s layout, or simply moving around some of its elements. For example, if you’re looking to add a second sink for couples or siblings, or if you’re thinking about adding home accessibility features, that might mean moving the toilet and creating a new floor plan.

The more extensive bathroom remodels can be the most expensive but also provide the most flexibility. This level of renovation typically involves changing or relocating some of the major fixtures, such as the tub, shower, sink, and toilet. It may also involve changing the location of electrical wiring, plumbing hookups, ventilation, and flooring.

It’s important to consider all of these factors when deciding which level of remodel to choose, because the more changes you make, the more work and expense you’ll have to deal with. Moreover, it’s often more cost effective to stay within the existing footprint and move only the fixtures that can be easily moved.

To help you make the most of your space, try using a user-friendly bathroom design software or app with planning tools that offer 3D visualization and allow you to experiment with different layouts and designs. These can be great visual aids to show contractors and other professionals and can help you stay on budget by preventing costly misunderstandings and delays.

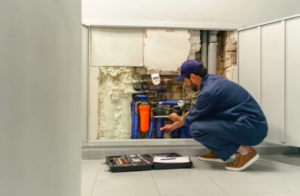
There’s a lot of specialized work that goes into a bathroom remodel. Plumbing, electrical, drywall and even framing can all be tricky for DIYers to take on. Unless you’re a licensed professional, leave these tasks to professionals. Any plumbers you hire should be licensed and insured to ensure your project is completed correctly and according to the local building code.

This is important for your own safety and the long-term durability of your bathroom. If you don’t follow proper codes, you could risk water damage and potential hazardous wiring issues down the road. It’s also a good idea to have any work done by a licensed professional so you can make sure they’re up to date on any changes in the local building code.

Some small cosmetic renovations do not require a permit, but more substantial remodeling projects often do. Moving fixtures, running new pipes for water and sewage, and a tankless hot water heater can all be considered major changes that require a permit. It’s a good idea to check with your city or county building department to find out what the rules are for your area.

As you’re moving through your bathroom remodel checklist, it’s a good idea to complete each task in a specific order. This can save you time and money by preventing messy clean up and by keeping the mess from one task out of the areas still needing work. For example, if you’re installing a new shower stall or tub it’s best to do this before laying tile. This will keep the newly framed walls protected from moisture. You should also install cement board and vapor barriers to protect the walls from moisture when you’re doing your drywall later on.

Electrical components like lighting fixtures, outlets, and switches are crucial to the functionality of your bathroom, but they also play a major role in its aesthetics. This is why it’s important to choose the right ones that complement your overall design aesthetic and meet your needs. For instance, recessed lights can add an elegant touch while providing ample light. They can also be installed with dimmer switches for a more customizable lighting experience. However, if you want to create a more modern and contemporary vibe, wall sconces are an excellent choice.

Another aspect to consider when choosing electrical fixtures and switches is their power capacity. It’s essential to know how much your circuit can handle during a remodeling project so you don’t overload it with too many appliances and installations. An electrician Vancouver can help you assess your home’s power capacity and ensure that any new additions are up to code.

Finally, you’ll need to install outlets for appliances such as hair dryers and electric shavers. These should be GFCI-protected to avoid electric shocks and are especially important near water sources. Your electrician can help you determine the number of outlets you need and where they should be placed.

Depending on the scope of your remodel, you may need to obtain permits before beginning any electrical work. Generally, any changes that affect plumbing, lighting, and/or structure require permits. However, if you’re only replacing a fixture like a shower head or toilet tank, you might not need to get a permit. It’s best to hire an experienced and licensed electrician to ensure that your remodel is safe and compliant with local codes and regulations. When interviewing potential electricians, ask for references and their portfolio to see their previous work. You should also pay attention to their communication skills and professionalism.

While many homeowners focus on tubs, tiles and faucets in their bathroom remodeling projects, the lighting work that needs to be done is equally important. The right fixtures, sconces and bulbs can take your bathroom from drab to fab.

Bathroom lighting should include all three types of light: ambient, task and accent. Ambient lighting provides general illumination of the room and can be accomplished with rows of recessed lights; ceiling-facing light fixtures that cast light throughout the bathroom; or decorative central light fixtures that create a focal point in your bathroom.

Task lighting is used for activities like bathing and grooming, and the goal of this type of lighting is to provide sufficient illumination for safe movement around your bathroom. It can be achieved by installing wall sconces on either side of your mirror or a fixture above the shower stall or bathtub. These light fixtures need to be positioned properly to ensure adequate illumination. They should be centered over your mirror and mounted about 28 inches apart, with the top of the fixture at least 78 inches from the floor.

Accent lighting falls between task and ambient light, as it is used to highlight a feature of the bathroom or its décor. These can be recessed or hanging fixtures, such as chandeliers. Directional recessed light fixtures can also be angled to illuminate artwork or other impressive design features in your bathroom.

Lighting and sconce upgrades can be completed by homeowners who are comfortable with DIY projects, but electrical and plumbing work should always be left to licensed professionals. These experts can guarantee that your new bathroom will be safe, up to code and fully functional.

How to Build a Glass Company

Having an excellent team is very important to the success of Atlanta Glass Company. A good team helps to reduce owner dependency. A highly dependent business is not valued as much by a buyer.

Glass Company

A positive safety culture can help create a safe working environment for glass factory workers and reduce the risk of accidents and injuries. Creating this culture requires the commitment of management to implementing and following safe work practices and procedures and establishing safety policies that are regularly reviewed and updated.

A safety policy should include clear rules and procedures for employees regarding machine safety, including proper lockout/tagout procedures. This includes shutting down and isolating machines during maintenance and repair work to prevent the accidental start-up of equipment that could injure workers. Additionally, machine guarding is necessary to protect workers from moving parts, electrical hazards and other potential dangers.

Several other safety measures should also be in place, including proper body protection and a commitment to ongoing training and inspections. Workers should wear protective clothing such as aprons, coveralls and vests made from flame-resistant or chemical-resistant materials. In addition, they should wear safety shoes that have non-slip soles to prevent slips and falls. A commitment to regular inspection and cleaning of all PPE will also reduce the risk of injury.

Manual handling of glass puts workers at risk for cuts and punctures, especially if the correct lifting techniques are not used. Using appropriate gloves can minimize these risks. Workers should wear a pair of cut-resistant gloves during every step of the production process and replace them when they show signs of wear and tear.

Many of the chemicals and materials used in the glass manufacturing process can be toxic if not handled properly. They can also cause respiratory problems, eye and skin irritation and burns. Workers should follow all chemical safety guidelines, including wearing appropriate protective equipment and working in well-ventilated areas.

Fire hazards are a concern in any factory, and a glass factory is no exception. A fire safety program should be in place, with a clearly-marked evacuation route and emergency contact information posted throughout the plant. In addition, the use of fire-resistant walls and doors should be encouraged to limit the spread of smoke and heat during a fire.

Finally, a positive safety culture should involve the participation of all employees, from top to bottom. Employees should be given the opportunity to report safety concerns, and managers should make sure that everyone is aware of the importance of following workplace safety guidelines.

Durability

While many factors can affect the durability of glass and metal, there are several steps that a company can take to ensure that its products last longer. These include ensuring that the materials meet building codes and standards to protect occupants from hazards. Additionally, it is important to keep up with industry trends so that companies can offer their clients the latest and greatest materials. Finally, it is also a good idea to consult an expert when selecting the right material for a particular application. This will help ensure that the selected materials will be able to hold up to wear and tear and will continue to look great for a long period of time.

Depending on the specific needs of the business, a glass company may choose to use tempered soda lime glass or aluminosilicate glass. Each type has its own unique benefits, but both are able to provide high strength and excellent insulating properties. Tempered soda lime glass is particularly suited to commercial applications because it can be fabricated into various shapes and sizes. In addition, this type of glass has good chemical resistance and can withstand temperature extremes.

The production process for both types of glass involves a lot of pressure and force on the glass. It is important that the manufacturer measures the strength of the glass to ensure that it is up to par. A company can do this by using either pendulum testing or impact force sensors. While pendulum testing is a tried-and-true method that has a long history, impact force sensors are more modern and offer a number of advantages over traditional pendulum testing.

A glass company can also use a solution to increase the chemical durability of its glass beads. This process involves contacting crushed glass particles with an aqueous alcoholic solution of a soluble aluminum-containing salt and then firing the coated glass particles in a vertical furnace to produce glass beads with improved chemical durability.

Larger glass industry corporations will often have a centralized office where strategy and marketing decisions are made. However, the actual operations are often more specialized. For example, a large glass and framing manufacturer may have a division that focuses on manufacturing components, another that specializes in installation services, and another that specializes in fabrication and design.

Environmentally Friendly

Glass is a sustainable material that is infinitely recyclable, reusable and refillable. It uses fewer raw materials and saves energy, which reduces carbon emissions. It also promotes the development of sustainable communities by creating jobs and supporting local business. The glass industry is committed to reducing its environmental impact by implementing new technology, processes and products.

The primary raw materials for glass are sand, soda ash and limestone. These are collected from the environment in a way that respects ecosystems and follows strict specifications. The glass industry also focuses on increasing the proportion of recycled raw materials. In addition, it is developing new technologies that can save energy in the production process, including a super-insulating ceramic furnace wall called ThermotectWall.

A glass company that utilizes these measures can help customers meet their environmental goals. Moreover, it can help them achieve LEED credits for their projects.

Glass production is an energy-intensive industry, and it generates large volumes of emissions. These emissions include sulphur dioxide (SO2) from the decomposition of sulphate in batch materials and nitrogen oxides (NOx) from high melting temperatures. These gases cause acidification and are a significant part of the global climate change problem.

Fortunately, the glass industry has made major strides to reduce its energy use and emissions over the past 50 years. In fact, it is already 70% less energy-intensive and emits 50% less CO2 than it did fifty years ago. However, it still has a long way to go to become fully climate-neutral.

To meet this goal, the glass industry needs to invest in more efficient equipment and make use of renewable energy sources. It also needs to work with governments and other stakeholders to transform regulation and make it easier for glass manufacturers to transition to climate-neutrality.

Design

The glass industry is incredibly diverse. Some companies produce glass bottles, while others manufacture windows and doors. In addition to focusing on quality, durability and safety, glass companies must also consider design. They must be able to provide architects and designers with the tools they need to create their visions. They must offer innovative products, flexible processes and cutting edge technology. They must also be able to meet the demands of a global economy.

Regulations govern every facet of the business, from manufacturing to importing raw materials and selling products. They can help ensure that every step is done correctly and eliminate the possibility of arbitrary decisions. These rules can vary by region, but there are also standard regulatory bodies for the industry in general.

In the past, large glass corporations could operate with centralized decision making, but these businesses must now focus on maximizing efficiencies and cost reductions. This can include the use of multi-touch displays and cloud-based collaboration. These devices allow employees to communicate and collaborate on projects from remote locations. This helps to save time and money while promoting productivity.

Other glass companies have adopted a more flexible approach to design and fabrication. For example, is a company that has adapted to the changing market by offering products like glass light bulbs and automated machine processes. The company has also improved its glass production by using less energy and producing greener products.

The Importance of Industrial Plumbing

Industrial plumbing involves the construction of pipe networks for the transport of fluids. These pipes must be able to withstand high pressure and specific temperatures.

Issues like a leaky sink or inefficient water heater can impact a commercial space. This is why prompt repairs are so crucial for these systems. Visit Website to learn more.

plumbing

Industrial plumbing is a hugely important part of maintaining proper facilities in any commercial building. It’s a complex field that requires expert knowledge to properly design, install, and maintain. It’s also a field that is often misunderstood by the general public, and there are many people who don’t know what it involves or why it’s so important.

Unlike residential plumbing, which deals with only a few pipes and facilities, industrial plumbing is designed for large-scale water usage. These pipes are thicker, and they must be able to handle much higher levels of pressure and flow velocity. Additionally, these pipes must be able to transport more than just water, such as waste or chemicals. The plumbers who specialize in industrial work are familiar with all these issues and can create a system that is able to meet the needs of the facility without any problems.

The plumbing systems in commercial buildings also have to be more durable than those in homes. This is because they are often used much more frequently. For example, if a toilet is flushed hundreds of times a day in a school, it is going to start showing signs of wear and tear a lot faster than a toilet that is only used 50 times a day. This is why commercial plumbing systems are often designed with a higher grade of materials and more durable fixtures.

Another thing that is different about industrial plumbing is that it has to be well coordinated with other parts of the building. For example, if there are a number of sinks and toilets in a stadium that are being used during a big event, the plumbing must be designed so that these facilities are able to operate without disrupting the event.

There are many different aspects to this type of plumbing, and it’s one of the reasons why companies who offer industrial plumbing services have a lot more work on their hands than plumbers who only work with residential customers. This is because it takes a lot of planning and expertise to make sure that all the components of a plumbing system are working together to provide clean, safe, and reliable water for an entire building or facility.

When most people think of plumbers, they picture residential plumbers who take care of things like clogged drains and water leaks in homes. However, there’s a whole other segment of the plumbing industry that deals with industrial buildings, and this is where industrial plumbers come in.

The main task of industrial plumbers is to set up pipe networks that transport fluids. These fluids are usually intended for a specific purpose and need to be transported at certain pressure and temperatures. Therefore, the pipes used in an industrial plumbing system are typically thicker and more durable than those found in a home.

Another important aspect of industrial plumbing is to install and maintain the heating, cooling, and sprinkler systems of a building. These systems are necessary for keeping workers comfortable and productive, as well as for maintaining the safety of the building and its occupants. Industrial plumbers also have the skills and knowledge to develop detailed reports of an industrial building’s water usage and suggest ways to reduce it.

Besides water, industrial plumbing can also deal with other fluids such as gas and oil. In these cases, the plumber will have to consider their physical properties and how they might affect other materials that could be mixed with them. This is why it’s so important for a professional industrial plumber to know all of the laws and regulations governing their work.

Industrial plumbers are often called on to deal with emergencies in industrial facilities. For example, if a food factory suddenly loses its water supply or the drains become blocked, it’s the industrial plumber who will have to react quickly and efficiently. To handle such emergencies, they will usually need to have access to a vehicle with a trailer that can carry tools and equipment, as well as an experienced technician who can manage the situation until help arrives. This is especially important since many industrial facilities operate on tight schedules and cannot afford to shut down their production lines for long periods of time.

When most people think of plumbers, they imagine residential plumbers working on clogged drains and leaky toilets. In reality, though, there’s a whole other realm of plumbing that keeps businesses, hospitals, schools and factories running smoothly: industrial plumbing.

Unlike residential plumbing, which is mostly focused on household water usage, industrial plumbing is all about larger scale projects and equipment. It’s not uncommon for commercial properties, like office buildings and shopping malls, to have dozens of sinks, toilets and water fountains spread across multiple floors. In these cases, the piping systems can get extremely complex, making it more difficult for plumbers to troubleshoot issues when they arise.

This is where the training of an industrial plumber comes into play. Unlike residential plumbers, who can typically learn on the job or attend a vocational school to become certified, industrial plumbers must complete an apprenticeship of 4-5 years before they’re eligible to take the test to become licensed. The responsibilities of an industrial plumber include installing and maintaining pipes that transport water, waste, steam or gas within a facility. Often, these piping systems are hidden from view behind walls or drywall, so it’s important for plumbers to know how to navigate these spaces without damaging the building.

The first thing that happens when an industrial plumber gets called out to a job is an initial assessment. They’ll listen to the customer’s description of the problem and ask questions to gain a better understanding of the situation. From there, they’ll either repair the existing piping or install new lines. If they’re installing new lines, they’ll need to consider factors like pipe diameter, material type, piping length and whether or not the existing pipes are able to support the anticipated water usage.

The work of an industrial plumber can be dangerous, so it’s important for plumbers and their employers to follow proper safety protocol. This includes wearing personal protective equipment (PPE) when handling pipes and other materials, as well as following hazard communication and chemical safety policies.

There’s no denying that indoor plumbing has made life far more convenient than it would be without it. When issues like a dripping faucet or a broken water heater occur, homeowners turn to their local plumber for help. But what about businesses? What if they have a problem with their toilets or sinks, for example? Who do they call then? While residential plumbers take care of problems in homes, industrial plumbers serve a much bigger purpose.

In a business setting, the pipes and fixtures that industrial plumbers service are used on a much more frequent basis. This means they’re also more likely to break down. Issues such as leaky taps or inefficient water heaters are much more significant problems in an industrial setting than they are in a home because they could result in massive waste of resources and cost the business money.

Additionally, commercial buildings often contain a lot of equipment and machinery that can be very delicate or expensive to replace. Industrial plumbers are able to troubleshoot and repair these systems so that businesses can continue operating as normal.

The most common services that industrial plumbers offer are installing and repairing water pipes, gas lines, and vents. They can also use fittings to construct fixtures such as showers and sinks (although this doesn’t include toilets as they belong to a separate trade). Industrial plumbers are skilled at working with a variety of materials, including stainless steel, copper, cast iron, and PVC.

Leaks and other problems in industrial settings are a major concern because they can lead to costly resources being wasted and potentially even health violations. Industrial plumbers ensure that the plumbing systems in hospitals, schools, and factories are up to date with the latest specifications to prevent these types of issues.

Industrial plumbing is an essential part of our daily lives, and it’s important to have a reliable plumber on hand when issues arise. Whether it’s a clogged drain that stops up the entire system or an old, corroded sewer line, industrial plumbers can provide quick and efficient repairs so that businesses can continue operating smoothly.

What Does a Plumber Do?

Plumbers In Cleveland Ohio install and repair plumbing systems in homes, buildings, factories, and other locations. They must have excellent troubleshooting skills to diagnose problems and recommend solutions.

Many plumbers work independently or for large construction companies. They may need to be on-call for emergencies, leading to unpredictable schedules.

Plumbers install, maintain, and repair the pipes that deliver water, gas, and sewage to and from homes and businesses. Their work ensures that people have access to clean drinking water and that waste is disposed of safely and efficiently. Plumbers often use hand tools, power tools, and diagnostic equipment to complete their tasks. They may also need to weld and solder metals. Plumbers can pursue various career paths, including taking trade school courses or participating in an apprenticeship program. Some plumbers are self-employed, and others work for large plumbing companies or construction firms.

Plumbers must be able to adhere to strict health and safety protocols when working with chemicals, sewage, and other hazardous materials. They must also be comfortable working in tight spaces and at heights. Plumbers are often on-call to respond to emergencies, so they must be able to adjust their schedules as needed. This can lead to irregular hours, especially during a plumbing emergency, such as a burst pipe or clogged drain.

Plumbers typically need at least a high school diploma or equivalent to start their careers. Most receive their training through an apprenticeship program combining classroom instruction with paid on-the-job training. They may also attend a technical school for courses in pipe system design, welding, and other relevant topics. Most states and cities require plumbers to be licensed to work. Plumbers must complete several exams and have some experience before becoming licensed.

Gas lines carry highly flammable gas to appliances that use fire to operate, such as stoves, ovens, and water heaters. If these lines are damaged, it can lead to dangerous leaks that put people and property at risk. Plumbers are trained to inspect for and repair faulty gas lines. They can also install carbon monoxide and gas detectors to help prevent these deadly hazards.

When a gas line is broken, plumbers may be able to repair it by inserting a new lining into the pipe. This method can save time and money, as it often doesn’t require shutting off the gas or disconnecting appliances. However, it is inappropriate for all types of damage and may not last as long as a newly installed pipe.

Because gas lines are typically buried underground, they are vulnerable to environmental factors like moisture. Over time, this can cause them to rust and leak. When this happens, the homeowner may notice a dead patch of grass above the line or a strong sulfur odor. In severe cases, the line may need to be replaced completely.

Plumbers can install gas lines made from various materials, including copper, steel, and cast iron. They also know how to properly connect these lines to appliances and home systems, such as the water meter and main gas line. The plumbing industry is regulated by local and state governments, with the most specific licensing requirements. However, experience and reputation should be the primary deciding factors when choosing a plumbing professional for gas line installation or repairs. A reputable plumbing company will offer competitive pricing and warranties or guarantees on their work.

Often, plumbing issues arise unexpectedly and need to be repaired quickly. This requires plumbers to have quick-thinking skills and be able to assess problems and find effective solutions. They may need to work with various tools and equipment, such as power tools, wrenches, pipe cutters, soldering equipment, and diagnostic testing devices. They also need to be able to read and interpret blueprints and construction plans.

Plumbers are responsible for installing and repairing the pipes, fixtures, and appliances that ensure safe and clean water supply and efficient drainage. They are also needed to inspect and maintain sewage and waste systems. In addition, they must be able to solve complex issues like leaks, clogged drains, and malfunctioning appliances. Plumbers typically work with both residential and commercial customers.

The most common plumbing services are repairs to noisy or leaking pipes, clogged drains, and broken fixtures. These can be caused by several factors, including old age, water hammer, loose pipes, or overly high water pressure. Sometimes, plumbers may need to replace parts or whole piping sections.

Plumbers can also help prevent these issues by regularly maintaining and flushing their piping systems. This will remove debris and sediment buildup, which can cause clogs and pipe corrosion. They can also install water hammer arrestors to reduce noise and prevent water damage.

A plumber must interpret building codes and regulations when installing plumbing systems. This ensures that the system complies with local building standards and protects people from potential safety hazards.

Plumbers also use specialized tools that are not available in hardware stores. These tools are used to inspect pipes for any damage or leaks and to determine the best course of action for repair. They can also help with planning plumbing systems for new construction projects. This is especially important for commercial and industrial facilities that must follow strict water and waste management regulations.

Another advantage of hiring a professional plumber is that they can guarantee their work. This is a great way to give customers peace of mind that their plumbing problems will be fixed correctly and efficiently. However, it would help if you always asked whether a plumber’s guarantee is valid before hiring them.

In addition to offering quality artistry and guarantees, plumbers can prevent future plumbing problems by identifying and fixing them as they arise. This can save you time and money in the long run. They can also advise you on how to maintain your plumbing systems, preventing them from becoming damaged or infected in the future.

Plumbers often work long, hard hours and must be physically fit to do their job. They also face many safety hazards, such as working with chemicals and flammable materials. In addition, they must bend and crouch to get into small spaces where equipment is located. These conditions can result in back injuries and other health problems. Despite these challenges, plumbers are still in high demand and can make good money.

When consumers call a plumber, they are often in an emergency. They need someone to answer the phone on the first ring, understand their problem, and come out to fix it quickly. If they get sent to voicemail, they may not call back or recommend the business to a friend. If you want to stand out from your competitors, provide excellent customer service.

Be polite and respectful of customers and their homes at all times. Keep your clothes clean and neat, and carry breath spray if you smoke. Make sure you speak clearly and have good written and verbal communication skills.

Many plumbing jobs involve working with pipes, water systems, and toilets. You may also be responsible for drain cleaning and clog removal. In some cases, you may install or repair gas lines. Plumbers also work with electrical systems and must read blueprints and technical manuals.

Consumers call a plumber because they don’t have the time or desire to do the job themselves. They want a trusted professional to show up on time and solve their problem. If you’re a friendly, knowledgeable, and trustworthy plumber, the consumer will return to your company and recommend it to others.

Providing excellent customer service can take effort, but it’s worth it. Listening to the customer’s needs and demonstrating empathy can create a trusting relationship that keeps people returning for all their plumbing and HVAC needs. A live answering service available 24/7 can help you convert your calls into valuable customers. MAP Communications’ front-desk agents are trained to ask the right questions and immediately connect them with your team or on-call plumber.

Excellent Advice About Travel That You Will Want To Read

Safety when you travel is extremely important, especially if you are traveling to a country that you are not familiar with. It can be difficult to understand the culture and the language. There are some basic safety tips that can help you through, and we will discuss them in this article.

If you are traveling to another country brush up on that country’s laws. Some foreign countries have laws that you might view as a little strange or not expect. As a precaution, it is always a good idea to familiarize yourself with the laws specific to the place you are visiting.

When traveling to poor countries or countries with high crime rates, keep all of your valuables out of sight. Don’t wear a camera over your shoulder or even a cheap watch on your wrist if you don’t want to attract the attention of thieves and beggars. Carry a shoulder bag for these types of items instead.

In areas that offer air conditioning as a “luxury extra” on buses or inside movie theatres, always carry a lightweight jacket or sweater. Instead of bringing the heat to a manageable level, the air conditioning in many of these locations can be overwhelming, especially if you are coming in and out of high temperatures.

If you travel by air frequently, it’s a good idea to learn the rules of the TSA. Every airport has a security checkpoint that you need yo pass before you can get too your plane and not knowing the security rules can make your time at the checkpoint frustrating for you and the people around you.

You go on vacation to have fun, but having fun should not mean letting your guard down. As we have discussed in this article, remaining safe should always be your top priority when traveling. Keeping a few basic safety tips handy can give you peace of mind, and make your trip more enjoyable too.

You can also visit our other websites and post your article.
Dallasautorepair, Premier Limo Boston, Junk Removal Porterville, Midwest Grill Saugus, Chartwell Estate Sales,Hair Solutions Beauty Salon, Concretestampsreview, The Movers Packers, New Info, Duckham Photography, Home Based Business Guide, Bathroom Tile Installation, Caer Philly Home Improvements, Wayneenterprisescarpetcleaning, Chests And Cabinets, Cosmetic Dentistry Shalimar, https://www.drywall-1.com, Home Pool Cleaners, Implantdentistryoforlando, Milano Citta Metropolitana, Birminghamuncontesteddivorcelawyer, Talisman Lighting, Lechleitner Builders, Accountinglasvegas, Tampicokitchen, Adoption-center, Westland Car Care Automotive, New Fireplace Inserts, AC Repair Of Las Vegas, Baltimore Heating And Airconditioning, Portland Carpet Cleaner, T Sheppard Photography, Internetbusinessmadeeasy, Lucky Strike Mine, Tree Growing 101, Go Green Landscaping Inc, Lloydsdetailing, Accounting Voice, Pres Tree, Federal Heights Locksmiths, Raleigh Durham Kitchen Bath Remodeling, Cryptostashs, Maine Business Lending, Zero Gravity Tower, Leesdetailingservices, Special Rate Limo, Ask Me Gutter, Libertyairductcleaningservice, Mobile Home Salesmen, Robervin Construction

Gas Leak Repair – How to Detect and Repair a Gas Leak

If you suspect a gas leak, you should turn off your gas. Then, apply a mixture of soap and water to all the connections, joints, and valves. Bubbles will form around any pin-hole leaks, indicating that the line needs to be repaired.

Gas Leak Repair

Once you’ve identified the source of the leak, please wait for a certified professional to come and seal it. Meanwhile, open your home’s windows and doors for fresh air circulation to dilute any carbon monoxide concentration and reduce inhalation risks. Contact Gas Leak Repair New York for professional help.

Even a properly installed gas line can crack, leak, or break due to shifting soil, corrosion underground or damage caused by nearby trees. When this occurs, several dangerous situations can arise including carbon monoxide poisoning, fires and explosions. Knowing how to detect a gas leak early can help you take quick action and prevent these issues from happening in your home.

One of the most telltale signs of a gas leak is a foul sulfuric or rotten egg smell. While some may attribute this to a bad plumbing job, the truth is that most natural gas lines have sulfur added to them specifically to alert homeowners of a leak. If you notice this odor in your home, you should evacuate immediately and call a professional for immediate gas line repair.

Other symptoms of a gas leak include a hissing noise near appliances or pipes, and visible damage to the pipe or connector. Some people also experience itching or burning sensations in their eyes and throats, which can be a sign of direct exposure to the leaking gas. If you experience any of these symptoms, evacuate the area and do not reenter until DTE Gas confirms that it is safe to return.

A simple soap and water test can help you determine if there is a gas leak in your home. Using a mixture of soapy water, spray or brush and covering the areas around any gas piping in your home, you should be able to see if there are pin-hole leaks by looking for bubbles that appear on the surface. If you see these bubbles, you should turn off your gas and leave the area until it can be fixed by a professional.

Another simple way to detect a gas leak is by moving lead acetate test strips in the area where you suspect a leak. These test strips will change color if there is a gas leak. You can buy these strips at most hardware stores and some supermarkets, or you can hire a professional to use more advanced equipment for detection.

Identifying the Source of the Leak

Gas leaks pose a major threat to your family’s safety and cause significant damage to homes, businesses, and the surrounding environment. They can also be very difficult to detect, especially if the pipes are buried underground. When they do occur, it is important to react quickly to avoid further problems and to keep everyone safe.

Some of the most common signs that you have a gas leak include:

A musty, rotten egg smell in your home or business. This is a sign of carbon monoxide poisoning or another air contaminant, and both people and pets can become seriously ill from exposure.

The sound of hissing or whistling near a gas line. This is a sign that gas is escaping, and if it escapes for too long, it could contact an ignition source such as an open flame, causing an explosion or fire.

Physical damage to the gas pipe or its connectors. If you find any damage to your gas lines, it is important to call a plumber immediately.

Symptoms of direct exposure to the gas, such as itching or burning in the eyes or throat. This is usually caused by a lack of oxygen due to a gas leak, and can lead to dizziness or fainting if exposed for too long.

If you detect any of these symptoms, it is essential to evacuate the area and to turn off any electricity in the vicinity of the suspected leak. This includes cell phones, landlines, appliances, and any other electronic devices. Opening the windows and doors in your home is also important, as this allows the gas to escape more easily and reduces the concentration of it inside your house or business.

You should never search for the source of a gas leak on your own, as this can expose you to the leaked gas and make it much more dangerous to deal with. Attempting to repair the leak or searching for the cause of it yourself can also put you at risk, as you may be able to trigger a spark or ignite the leaking gas, leading to an explosion or fire.

Sealing the Leak

If you are unsure whether a gas leak is present, or are noticing some of the signs such as dead house plants or a higher than usual gas bill, it’s best to evacuate the area and call emergency services right away. You should also turn off the gas supply if it’s safe to do so, and make sure that the area is well-ventilated. This will prevent any further damage from being caused by the escaping gas, and it will also allow the plumber to test and locate the source of the leak.

A leaking gas pipe will need to be repaired before it can be used again. Ideally, this should be done by a professional who is familiar with working with pipes and can ensure that the repair is made correctly. They will use a sealant that is designed for this purpose and can be applied using a caulking gun. They will also make sure that the pipe is properly ventilated to avoid any further build up of gas inside the pipe.

It’s important to regularly check the pipes in your home for any signs of a gas leak. This will help to prevent the situation from getting worse and can save you a lot of time and money in the long run. It’s also worth having carbon monoxide detectors installed in your home, as these can help to identify the presence of a gas leak early on.

Trying to fix a gas leak on your own is extremely dangerous, and it’s usually better left to a professional who has the correct tools and experience to do the job correctly. This is particularly true if the leak is located underground or in a difficult to reach place, such as behind a wall. Contacting a plumbing service for this type of work can also help to save you money, as it will be cheaper than trying to fix the problem yourself and may require the services of an engineer. This will be especially the case if the leak is found to be the result of a faulty or old gas line that needs replacing.

Testing the Leak

When working with natural gas, you should always seek professional help. There are many things that can go wrong, and some of them could be life-threatening if not dealt with right away. These include faulty equipment and appliances, improper installation, and old pipes. A regular maintenance check can prevent these problems from occurring in the first place.

You can also look for the signs of a gas leak. These include a foul smell similar to rotten eggs, hissing noises from an appliance or connection, and symptoms such as nausea, headache, dizziness, fatigue, and confusion. These are all important clues that a problem is occurring, and you should act quickly.

Once you have detected a gas leak, it is time to evacuate your home and call a professional. Make sure everyone in your house is aware of the problem, and that they understand to stay away from appliances like stoves and heaters. They should also leave the pilot light or gas meter off and not use anything electric in the area. This will reduce the chances of sparks, which can ignite the leaked gas.

When you are evacuating, you should open windows and doors to let in fresh air and limit the amount of gas that can build up inside the house. You should also avoid using electronics, including phones, tablets, and light switches, as these can trigger a spark and cause ignition. It is best to get out of the house as soon as possible, and a professional will be able to tell you when it is safe to return.

Once a technician has inspected the area and found the source of the leak, they will shut off the gas supply and clean up any areas that have been damaged. They will also replace the plastic covers on any exposed lines. Once the repair is complete, they will test the gas line with a detector to ensure that there are no more leaks. They will also replace any covers that they removed to work on the lines. A professional will have the tools and experience to work safely around natural gas, so you can be confident that the job will be done correctly.

Residential Plumber

Plumber Montgomery TX installs, repairs, and maintains pipes and fixtures associated with heating and cooling in a home or other building. They can also interpret blueprints and building specifications and do work requiring soldering, brazing, welding, and/or rigging.

Plumbing

Residential plumbing issues are more accessible to diagnose and solve, as homeowners tend to use plumbing systems more regularly and will notice small leaks or problems sooner.

The plumbing system in a house is a network of pipes that distributes water to appliances like sinks, toilets and showers, while also removing wastewater. It is critical for our health and hygiene, yet it is often overlooked because of its behind-the-wall structure. A professional plumber can accurately install this system to ensure that your household has access to clean and sufficient water for use in cooking, washing and cleaning.

Plumbing systems are complex, with multiple subsystems including water supply pipes, drain pipes and sewer lines. Each pipe works independently and has its own function to play in the overall plumbing infrastructure of a home. Depending on the type of house and its location, some components of a plumbing system may be different from others. For example, houses with wells may have different piping structures than those that connect to public water and sewer systems.

Residential plumbing pipes are typically made from durable materials that can handle high volumes of pressure and varying temperatures. Copper pipes, for instance, are a popular choice because they can last up to 50 years without corroding. Another common option is PVC (polyvinyl chloride) pipes, which are flexible, easy to work with and can withstand different types of water temperatures. These pipes can even be used in outdoor applications. For homes that previously had polybutylene piping, a plumber can replace these with the more durable PEX (cross-linked polyethylene) pipes.

Other durable and effective piping materials include galvanized iron and cast iron. These are less expensive than copper and can still provide a long lifespan, though they may have potential problems with corrosion over time. Galvanized pipes tend to be narrower than other pipes, which can decrease the amount of water they are able to transport.

When it comes to a home’s drainage system, it is important to keep in mind the size of the septic tank and how that will affect sewage flow and disposal. A good plumber will be able to help you choose the right septic tank size based on the number of bathrooms in your home and the size of each toilet.

If you are building a new house, it’s a good idea to get the plumbing system installed before starting any interior decoration. This way, you’ll be able to move into the house with all the plumbing and electrical wiring in place, which will make your relocation easier on yourself and your family. It will also be more cost-effective to do this than to have the entire project reworked later on. A plumber can give you valuable insights into whether a classic or modern plumbing system is best for your home. Each has its own advantages and disadvantages, so it is important to weigh these pros and cons carefully before making your decision.

Classic Residential Plumbing

Having an efficient, functional plumbing system is one of the basic necessities in any home. However, homeowners often face a dilemma when choosing between time-tested traditional methods and cutting-edge solutions that cater to modern needs. It’s important to consider the pros and cons of each method, and consult with professional plumbers for expert guidance.

Classic residential plumbing offers advantages like reliability, cost-effectiveness, and the expertise of experienced professionals. On the other hand, it may have drawbacks including potential leaks, limited efficiency compared to newer alternatives, and higher maintenance requirements.

Unlike modern systems, classic residential plumbing is composed of metal pipes that are more prone to corrosion and can lead to issues such as leaks and clogs. This is why it’s important to regularly check and replace old components to avoid further problems.

In addition, classic plumbing systems typically use lead pipes or solder, which can pose health risks especially for children and babies. It’s recommended to have your home’s water tested for lead if you’re using classic plumbing, as a simple repair can significantly reduce the risk of health concerns.

On the other hand, modern plumbing systems offer a wide range of advantages including high efficiency, sustainability, and flexibility. They also tend to be more durable and easier to install compared to classic systems. However, these systems can be more expensive than their classic counterparts, and their energy efficiency isn’t always as good as the older systems.

Both systems have their merits, and the choice ultimately depends on your specific home’s requirements, budget, and priorities. A reliable plumber can assess your needs and recommend the right solution that will provide long-term benefits for your family.

The cost of replacing your pipes will vary depending on the size and age of your house, as well as how complex the installation process will be. For example, if you have galvanized pipes in your house, the installation will be more complicated than installing a newer pipe type, such as PEX or copper. Another factor that will influence the cost is the material used for the replacements. For example, copper is more expensive than PVC, but it’s an excellent choice for high-pressure situations and is unlikely to leak.

Advantages

A residential plumber can help with many common issues that occur in the home, including clogged drains, toilets that don’t flush, and signs of water damage in the walls or ceiling. They can also offer bundled services that include inspections and maintenance of the entire plumbing setup, helping homeowners save money by fixing issues before they become worse.

Unlike commercial plumbers, residential plumbers usually communicate with the property owner directly rather than a manager or tenant. This allows them to work faster and make decisions more efficiently. They may still need to get approval from a higher-ranking member if the budget for a project is high, though.

Water Heater Repair Basics

Water heaters are familiar fixtures in many homes. They are big metal cylinders usually kept in the basement or utility room. If you have no hot water, check the circuit breaker or fuse in your home that serves your water heater. It may have tripped and needs to be reset.

Tank-Style Water Heaters

plumber

A traditional tank-style water heater has a gas or electric heating element. Hot water rises from the bottom of the tank, passes through a dip tube, and back to the top. From there, it goes through your home’s pipes and into your faucets. The tank also contains a temperature pressure relief valve that keeps pressure from building in the unit. Depending on the age of your water heater, it can start to experience issues. This may be due to wear and tear, corrosion, or a leak. If you notice an increase in your utility bills, a change in water temperature or unusual sounds coming from the water heater, it could be time to call in Plumbing Company Shreveport.

The first thing you should do is test the elements. There are two on most units, and they run an electrical current through them to heat the water. If these aren’t working, it may be because they are causing your circuit breaker to trip. Another possibility is that they have burned out or become shorted. Element replacement costs about $20 each. If this doesn’t solve the problem, it is possible that there is a thermostat or high-temperature cutoff switch issue. These can be difficult to diagnose and repair, and are best left to an experienced plumber.

Another common issue is a faulty dip tube. This tube transfers cool water to the bottom of the tank so it can be reheated by the lower element. If this tube is cracked or broken, it can cause cool water to mix with the hot water and reduce its overall temperature. A plumber can replace this tube, which shouldn’t be too expensive.

If you’re dealing with smells or discoloration in your water, it may be a sign that the anode rod is corroding and releasing sulfur into the water. You can try turning off the water for a few minutes and then re-turning it on. This should help get rid of the odor or discoloration. If not, the anode rod will need to be replaced.

While it’s possible to extend the life of a conventional water heater through regular maintenance, it will eventually wear out and need to be replaced. Our plumbing technicians can assess the condition of your tank-style water heater and recommend an appropriate replacement.

Thermostats

A thermostat is the control mechanism that keeps a water heater running when hot water is needed. The thermostat is usually located on the outside of the unit or in a cabinet at the top of the tank. If your water heater is acting up, you should check the thermostat first to make sure that it hasn’t tripped or that its dial isn’t set too high.

The thermostat works by detecting the temperature of the water and sending an electrical signal to turn the heating elements on or off depending on what it is reading. There are a few different types of thermostats, and each has its own way of working. One type uses a bimetallic strip that coils and uncoils based on the water’s temperature, triggering an electric switch to start the water heater. Another kind of thermostat, called a rod and tube thermostat, has two pieces of metal with dissimilar coefficients of thermal expansion that create proportional pressure on a diaphragm or piston assembly that actuates the electrical switch.

There is also a third kind of thermostat called a mercury switch, which has a vial of mercury with three wires inside it that make connections when tilted left or right. This kind of thermostat is less common than the others.

If you have an older water heater, the parts in it may be worn out or corroded. If this is the case, your water heater will probably need to be replaced.

A malfunctioning dip tube is another possibility for a faulty water heater. If the dip tube breaks, it could cause cold water to mix in with the hot water. Unless you’re comfortable replacing a dip tube, you should call a professional plumber to do it for you.

If your gas water heater is having problems, it’s possible that its pilot light has gone out. If this is the case, it’s important to follow the safety instructions in the manual that came with your water heater to relight the pilot light correctly. If this doesn’t fix the problem, it might be a sign that your thermocouple or gas control valve has failed.

Anode Rods

Anode rods are long metal rods, usually made of magnesium or aluminum. Their purpose is to attract the iron, limestone and rust in the water that would otherwise corrode the steel tank. This saves the water heater and keeps the water clean, but they do wear out after a while and need to be replaced periodically. You can determine when they are worn out by noticing a “rotten egg” smell or looking at the rod and seeing that it is quite corroded.

Depending on your model, the anode rod may be exposed or hidden within the tank. If the former, it may be covered by a plastic cap. On the latter, you may need to remove a screw and insulating material to expose it. The first step in removing the rod is to turn off the power and drain the water heater (if it has a gas valve, use the “vacation” setting on the pilot light to avoid relighting when you’re done).

Once you have the tank empty, loosen the hex head bolt with a socket wrench, using work gloves, as it will be hot. When the bolt is loosened, pull out the old anode rod. The sacrificial anode will likely be corroded to the point that you can no longer see it. If you have trouble getting the rod out, you can try bending it, though this will make it harder to replace in the future.

When installing the new anode, smear Teflon pipe thread sealant on the end that will be in contact with the tank to help prevent leaks. If you have limited space above the tank, consider purchasing a flexible anode rod instead of the traditional model; these are made from short segments that snap together like tent poles.

Place the anode rod into place, tighten the bolt and install a new plastic cap. Then drain and refill the tank to flush out any sediment that might have collected at the bottom of the tank. Be sure to turn on the power and water again after you’re finished working to ensure that everything is running correctly.

Flushing the Tank

It’s important to regularly flush your water heater tank, which removes mineral buildup and prevents a corrosive layer that reduces the tank’s capacity. This is one of the most common maintenance tasks that DIYers miss, but it can help you save money in the long run.

First, turn off the power to your water heater at the circuit breaker or fuse box. This is an important safety measure because water inside a hot water tank can cause scalding burns if touched. Then, open a hot water faucet in your home to prevent a vacuum that could keep water from flowing.

Then, attach a hose to the standard outside-style drain valve on the bottom of the tank. It’s typically located next to the thermostat control knob. Open the drain valve and allow the water to drain for about 10 minutes. Then close the drain valve.

Repeat this process until you have drained about four gallons of water from the tank. This should flush out most of the sediment, but you may need to drain more.

After you drain the tank, use a bucket to catch the water. If the water is cloudy or you still see sediment in the bucket, you may need to flush it again. Repeat the procedure until you have clear water and no sediment in the bucket.

Finally, flush the drain and anode rod. This is a simple task for a plumber, but you can do it yourself with the right equipment.

A faulty or improperly installed gas water heater can leak carbon monoxide, an odorless and tasteless but deadly gas that can poison your family if in sufficient concentrations. It’s also a fire hazard and must be repaired or replaced immediately.

The best way to avoid these problems is to have a plumber inspect and service your tank-style water heater twice a year, and perform routine maintenance on it in between. This will not only keep your water heater running efficiently but will lower your energy bills, too. If you notice signs of a malfunctioning water heater, like lack of hot water or strange smells and tastes in your home’s water, call the plumbing experts at Simpson Plumbing today.

Design Elements of a Bathroom Remodel

A sleek, updated bathroom can add resale value to your home. It can also protect the health and well-being of your family.

Bathroom Remodel

Remodels that involve expanding or significantly changing your bathroom’s floor plan require a permit and more extensive construction costs. These may include transferring or redrilling joists, insulation, and drywall.

The layout of your bathroom is one of the most important aspects when considering a remodel. If you get this wrong, the room can feel cramped and unusable. The good news is that you don’t have to tear down walls or add a new room to get a better bathroom layout. Instead, the term bathroom remodeling refers to changes that affect the style, layout and overall appearance. This includes reviving existing features with different hardware materials, colors and styles or adding in new storage.

A common bathroom layout has the toilet and tub/shower lined up on one wall with a sink on the opposite side. This layout is efficient in a small space and saves on plumbing costs. However, it is not ideal if you are planning to have a door that opens into the shower.

Alternatively, you can move the sink to the corner of the room and place the toilet across from it. This layout is ideal for a full bath and allows the toilet and sink to frame a large window.

Natural light in a bathroom is important for many reasons, so consider positioning an essential piece such as the basin near the window. This is a great idea for a master bathroom layout or even for guest bathrooms. Having a window in the bathroom also helps to bring in more fresh air and can help reduce your energy costs as you use less artificial lighting.

Plumbing

Many homeowners have a vision of their perfect bathroom. But when it comes to implementing this vision, it is important to hire the right contractor to ensure that all aspects of the project are completed according to plan.

Remodeling involves a wide range of work that can impact your home’s plumbing and electrical systems. It is best to hire a professional to handle these changes, as they will know how to properly install new fixtures and materials to avoid issues down the road.

The right contractor will also be familiar with various remodeling techniques and products. They will be able to recommend the best options for your bathroom, based on your preferences and budget. They will also be able to assist you with selecting and purchasing all the necessary materials for your project.

Depending on the complexity of your bathroom renovation, you may need to apply for permits. This will require you to be patient and wait for the approval process. However, this is necessary to ensure that the work done is in compliance with local codes and regulations.

It is also a good idea to consider the accessibility of your bathroom during this time. Installing grab bars and non-slip flooring is a simple but effective way to improve the safety of your home. This will make your bathroom more user-friendly and increase its value in the real estate market.

Electrical

When a bathroom remodel involves changing the look and layout, the contractor will need to do some electrical work. This could include wiring new light fixtures, receptacles (outlets), and switches. The contractor will also need to connect the shower stall, toilet, and vanity to the plumbing and electrical systems.

The lighting in your bathroom is important for both its appearance and functionality. The right lighting will help the room feel bigger, highlighting features and creating a sense of depth in the space. It will also make the space more pleasant to use, as well as boosting resale value.

There are certain lighting requirements that your local code enforces. For example, the lighting circuit must have enough power to run an overhead light and exhaust fan. This should be a 20-amp circuit, and the receptacles must offer GFCI or AFCI protection.

Other electrical requirements in a bathroom include the use of wire connectors (also called twist-on connectors, ring terminals, or cone connectors) to secure the connections between cables and to keep them from touching each other. You will also need to use a big tool kit with pliers that can bend, hold, grab, and cut wires.

You should always consider whether the work you’re planning is a renovation or remodel, and consult a licensed professional to ensure that the changes meet your needs and local code requirements. Many states have laws requiring that certain types of work be done by a licensed professional and may require that your contractor pull a permit before beginning the project.

Flooring

Floors are a big design element that can pull together or detract from the look of a room. While some spaces require more complex flooring choices, a sleek, updated bathroom is one space where the right floors can instantly add value.

Hard-wearing, slip-resistant tile is a smart choice for bathrooms because of its durability and ease of cleaning. A variety of finishes and colors provide plenty of design options to suit your style.

Vinyl, or luxury vinyl tile (LVT), offers a waterproof option that’s easy to clean and can mimic the look of stone and wood. It’s available in planks or square tiles and is also less expensive than the natural products it’s designed to resemble.

Natural stone tile is another good choice, offering the same benefits of durability and a variety of naturally-occurring color and pattern options as ceramic or porcelain. It’s usually offered in a mesh-backed form to help reduce seams where water could slip underneath and cause bubbles or mildew.

Carpeting is an alternative, but it should be carefully considered because of the wet conditions in bathrooms. If you opt for carpet, look for loop or needle-punch styles that are designed to stand up to high traffic and moisture. Also consider installing a vapor barrier to protect your flooring and walls.

Cabinets

Cabinets might not seem like a high priority in a bathroom, but they make the biggest difference when it comes to organization. Think about the ways you store your toiletries, grooming tools, and cleaning products, then design a system that keeps them easily accessible in a well-organized way. Open basket cubbies are great for storing items that don’t fit into drawers, while tall cabinet shelves provide easy access to bottles of cleaner and other bulky items.

When it’s time to pick the cabinets for your new bathroom, consider both freestanding and built-in options. Both offer different benefits, depending on the size of your space and budget.

If you want a traditional look, opt for shaker-style doors with a wood finish to match your vanity. You can also choose slab cabinetry for a sleek minimalist look that lets statement pieces, like unique cabinet hardware or beautiful stone countertops, shine.

Laminate is another option that works well in bathrooms. It’s waterproof and durable, and you can choose between a variety of styles that mimic real wood or go for something more contemporary with faux metal finishes. If you’re working with a tighter budget, look for ready-to-assemble (RTA) or stock cabinetry rather than custom cabinets to save money. However, high-end cabinetry made with furniture-grade materials offers noticeable results that are worth the investment. The right cabinets can elevate your bathroom remodel from basic to stunning.

Lighting

The lighting in a bathroom can elevate the design or detract from it. For instance, a chandelier can make the room feel bigger, but it’s important to choose one that is properly sized for the space. Chandeliers that are too large can look bulky, and they won’t give off enough light to be practical for a bathroom.

Instead, opt for wall sconces or flush mounts for a more compact size. They also provide plenty of light and are ideal for illuminating mirrors or vanity areas. For the ceiling, you can go with recessed wet-rated lights for safety or track lighting for flexibility. Track lights can be adjusted to focus on different areas of the bath or highlight art and decor, and they come in many styles that work well in bathrooms.

Another way to play with the design of a bathroom is by changing the color temperature of the lights. Warmer temperature lighting tends to be more flattering, as it reduces shadows and makes colors blend in. This creates a softer and more relaxing atmosphere, which is perfect for a bathroom.

Once you’ve tackled the big elements of a bathroom remodel, it’s time to add the finishing touches. Consider incorporating grab bars for safety, non-slip flooring to prevent falls, and elegant accents that elevate the design of the space. These finishing touches will help your finished bathroom feel luxurious, and they’ll also increase the resale value of your home.

Bathroom Tile Installation Techniques For Everyone

Bathroom Tile Installation

The first step is establishing a baseline and center point. This might mean removing old tile or laying down concrete board.

Few walls are plumb and even if they are, tile simply amplifies their imperfections. That’s why it’s important to set up a guide to help you lay square and even rows of tile.

Lay Out Your Tiles

Using an interesting tile layout in your bathroom can elevate design and polish the overall look of the room. But to get the most out of this style technique, it’s important to do a thorough job in the planning stage to ensure smooth installation and an attractive finished product.

Creating accurate layout lines is one of the most important tasks that will help you achieve square and evenly spaced tiles. To do this, run a chalk line between the center points of opposing walls to create a straight line that will serve as your baseline for laying tile. This step should be done even before you begin tiling to establish a reference point for each row of tiles.

It’s also important to ensure that your substrate is sound and will be stable under the weight of the tile. A flexing floor or a sagging wall could lead to broken tiles and grout failure. Regardless of what type of substrate you choose–backer board, plywood or concrete–the surface should be water-resistant to prevent mold and mildew growth.

While many home centers stock all the necessary materials, it’s best to begin with a trip to a dedicated tile showroom where you’ll be more likely to get expert advice and assistance. While you’re there, sketch out your room and jot down dimensions for reference. This will help you determine the exact amount of tiles and supplies you’ll need.

Once you’ve determined the exact dimensions of your room, it’s a good idea to dry-fit your tile pattern (placing them on the ground without adhesive purely to plan the layout). This will give you an opportunity to see how the cut tiles at each end of a row will fit together. If they’re too small, you can shift the layout starting point to accommodate or you can use a wider tile on the ends.

If you’re working on a wall, it’s also a good idea to use a level to establish a top line that’s straight and flush with the ceiling. Few walls are truly plumb or level, so having this line will help you avoid a dizzying “everything’s slightly slanted” look.

Preparing the Surface

The substrate — the surface upon which tile is laid — plays just as important of a role as the tiles themselves. It must be sound, clean and dimensionally stable. For a wall, this means a backer board or cement, and for the floor it can be drywall or plywood. If the underlying material is concrete, it should be pre-treated to ensure proper curing and strength. The substrate must also meet industry standards for tolerance in surface plane irregularity and pitch toward drains or scuppers.

Prior to beginning any work on your bathroom tiling project, you should familiarize yourself with the specific requirements for your particular product and surface. This is to help ensure you understand how your installation process should proceed and comply with the manufacturers printed recommendations and trade and construction work health and safety standards.

When laying tile, it is generally best to start from the center of the room and work your way outward. This helps to keep your lines straight and allows you to minimize the number of cut tiles. You can use a bubble level to determine your center line and snap chalk lines on the floor to guide you as you work.

Before applying any thinset, make sure your tools are in good working order and that you have all the necessary supplies on hand. Some of the most essential tools include a wet saw, a level and a variety of trowel sizes. It is also recommended to wear a respirator mask to protect yourself from any airborne dust that may be generated during the work.

Before starting, it is important to prepare the surface of the wall or floor where you will be tiling by priming it. This will ensure that the bonding agent will properly adhere to the surface. Follow the manufacturer’s instructions on how to prepare the primer for your specific substrate. For example, some gypsum plasters require a sealer while others may need to be primed with a special masonry primer. It is also possible to purchase pre-mixed thinset that eliminates the need to mix the liquid and powder together. This can be a huge time saver but it is still a good idea to read the manufacturer’s recommendations for mixing this product.

Applying Thin-Set Mortar

To adhere your new tile, it must be set in a proper mortar. Traditional thinset is a cement-based mix of sand and Portland cement with water retention agents or activators. It’s available at home improvement stores as a dry mix that you must add water to create a slurry or pre-mixed buckets that are ready to use immediately. Thinset is also sold in a variety of viscosities, ranging from very thick to very runny. It’s important to use the right type of thinset for your project, as different types perform differently on various substrates.

To begin, mark accurate layout lines for your tile installation. Use a chalk line to run a vertical and horizontal line across the room where your center point will be for positioning tile rows. This will ensure that all tiles are installed in straight, even rows and that each tile is evenly spaced.

After the scratch coat dries, apply a second layer of thinset using the notched edge of your trowel. As you spread the mortar, keep a consistent finger pressure throughout the process to avoid lippage, which is where a tile is higher or lower than its neighbors.

If your thinset starts to stiffen, re-wet the surface by running water over it with your sponge. Continue this process as needed to maintain the correct consistency.

Once you’re satisfied with the consistency of your thinset, it’s time to lay your first row of tile. Use your straightedge to guide you as you place each tile, ensuring it’s placed square to the wall. To avoid uneven joints, use tile spacers between each tile as you install them.

Once each tile is in place, use a framing square or A-square to check that it’s level and straight. If it’s not, use a hammer and chisel to tap the tile in place. This helps to set it firmly in the mortar and eliminates the possibility that it will shift and become loose over time. It’s important to do this for every tile that you set, as shifting and crooked tiles can cause the entire floor to look uneven.

Laying the Tiles

Choosing where to begin is the first step in laying bathroom tile. It’s tempting to choose the wall that looks straightest, but you’ll get much better results by starting in the center and working outward. This will help ensure a symmetrical pattern, and it’s much easier to keep track of where you are in the process.

To establish your reference lines for the tile layout, run a chalk line from the center of one wall to the center of the adjacent wall. Then draw a line on the floor that intersects those two points, and use this as your guide. You can also mark out these lines with pencil and a straight edge, but the chalk method is more precise.

Once you’ve marked your reference lines, you can dry-fit a few rows of tiles without mortar to test the layout and make any necessary adjustments. It’s a good idea to include at least a quarter of your overall tile quantity in the dry-fit, because it will give you an accurate sense of how much room you have to work with once you begin to lay the actual mortar.

Before you start laying tile, check that the tile edges are perfectly flush with the wall edges. If you see any gaps, you’ll need to sand the edges down or apply some sort of sealant to prevent moisture from penetrating the surface and causing the wall to crack and chip over time.

Most tiles have directional arrows printed on them that point in the direction they should be installed. If you ignore these arrows, your pattern will look asymmetrical when you’re finished. This is a simple fix, and it will be far less noticeable once your grout has dried.

When you’re ready to install the tile, position a ledger on the floor or tub deck and then set your first row of tiles along it. The leadger should be slightly longer than the full width of your tile, and it’s helpful to place it a few inches back from the edge of the wall. You can create a similar effect by using a piece of wood or other straight board, but the leadger method works much better because it’s easier to control the placement of the tiles and makes it impossible to over-extend your grout lines.

Navigation